


Mastering is hard, and it may be easy, for some things come naturally, but for others, the need to unlearn is the most important thing in their production.
To master your song with not just one suite of a mastering plugin as you would only do, as you would try to use perhaps Izotope Ozone for your track; there are different ways to master your song. It’s not easy since you might need to think nonlogic and even do the process with as many as ten to twenty different plugins; all that will suit the purpose of the mastering process by each of them.
Though you might want to hear what this significant process does to a track, as it is available by listening below on this page, you might hear the difference between the tracks. The track, though, was 128kbps which we put through our process, thus giving higher frequency enhancement by all our operations on how to master the track more perfectly.

Though you need to understand that the process is to increase certain levels the professional way, each process is different from each of the tracks you will do, and that’s not always so choose wisely.
The track is 320kbps but has a lossless fix somehow. And sounds far better mastering than the original in the beginning. Though this one is the original:
But first, if you want to make MP3 more lossless, we also provide the specific capability through enhancement by Excitement of your track of the higher frequencies. This process isn’t easy and should only be done through authentic sound processing. After all, some frequencies might be much noisier and attain a higher load in this process.
So making it perfect will need thorough handling of all plugins and listening to the product not just once but also with the right studio monitors, headphones, and even earbuds. Earbuds would be best for knowing what is wrong with the higher frequencies. As well earbuds aren’t efficient in identifying more about your bass frequencies. Even stereo or studio monitors are preferred by many, some stereo’s play quality is different. Some amplifiers or sound cards might create a dull or body-less feel, also it needs to be accounted for.
The cheapest there are earbuds are the best buy and you can buy them on AliExpress; here is a link:
https://s.click.aliexpress.com/e/_oFDbR2M
Why are these the best buy? Yes, they are the cheapest “2$” because your levels need to be good in these and then you have quite better quality than many other producers, don’t just rely on this earbud, as you need several different ones as well, but you will be closer to grand quality than many others. They can’t sell them so they sell them for cheap. No one in the ordinary wants those but they are the ultimate in music production! As they make noise what is noise in your track.

So having, first of all, just a different setup with different headphones will enhance the probability of mastering your track more perfectly. It’s essential to talk about indeed the most authentic system of SoundBlaster SB-1300, which consists of two different processors, one THX or SBX, and the other is Recon3D. First, it’s 100% authentic sound-processing of THX, and with Recon3D, you get your tracks sound balanced, which means it will create a higher level of low sounding levels, not in case THX does.
So in case you want something to have a reference by using both of the setups, you will make sure that both buttons on the soundcard will sound genuinely different, and at the end of your mastering, you need it to sound 95% equal, you might be able to understand correct levels more professionally.
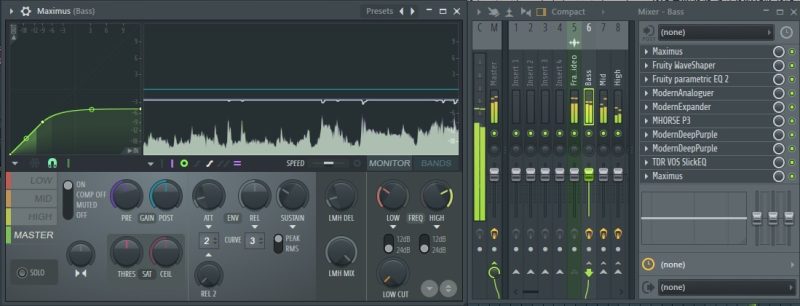
By then, to start doing your track, you will surely need to split your track into three different bands. That is undoubtedly hell to do, the process is for those who don’t know how to do that. We explain it easily here:
First, remember to send to 3 different other inserts in the mixer: Then by having the master channel send from the track, you need to turn it off. Therefore the track isn’t sent to the master.
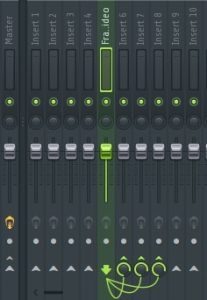
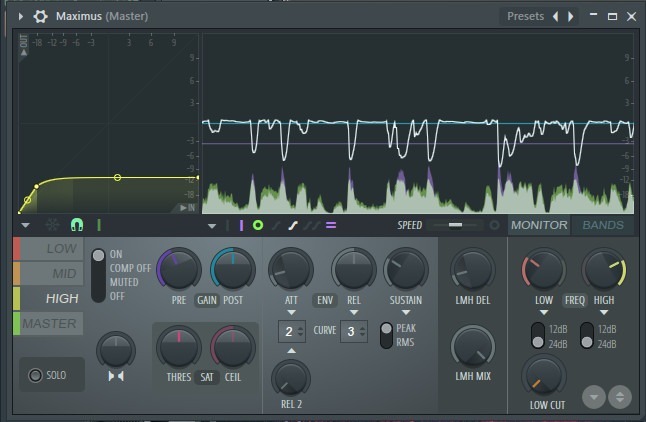
So by having your track sent to 3 different mixer unit channels, we first add Maximus.
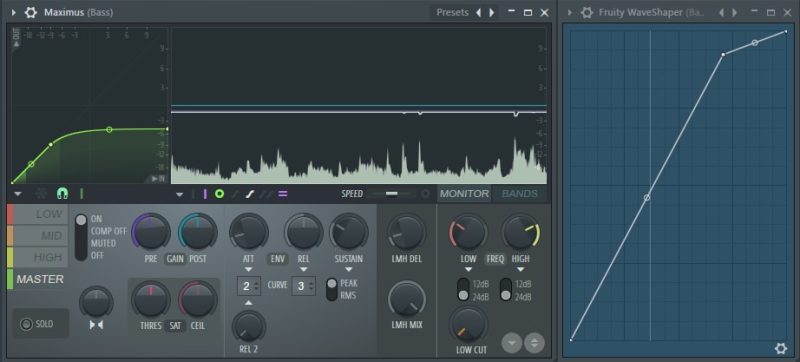
We have turned off the LOW CUT in all of the Maximus instances which is on the bottom right side of the plugin; it’s crucial to turn off 20Hz lower-level processing of the track since it even is enabled to around 40Hz cut of the sound. This 20Hz cut is wrong with Maximus.
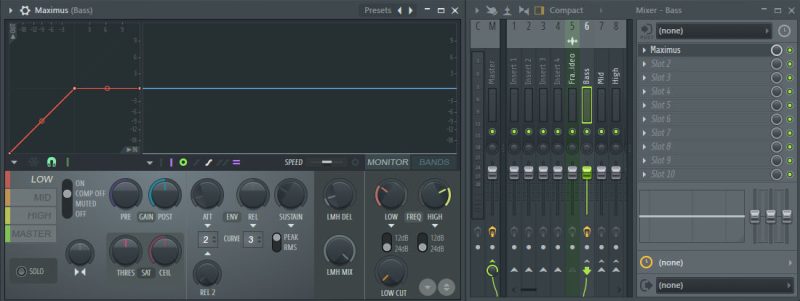
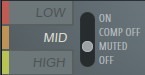
You might now see that we have it on the bass channel in the mixer. We changed the ON button to COMP OFF.
With COMP OFF, we process the sound into the master channel without processing it here. We do that to each band representing LOW, MID, and HIGH.
Bass, we keep it that way. But the last important thing is on the MASTER, so, turn your ON button as well COMP OFF.
Then remember to set the LOW channel “Bass” “to the MID channel.”
We didn’t do that much, but we followed the same for them for mid and high, LOW, and HIGH muted on MID. Then LOW and MID off with MUTED on the High channel.
It’s simply by passing through bands to the channels, and mute other channels, so single band will play only in the desired mixer unit, such that all bands can be mastered by their own way. You don’t want to put on vocal effects on the bass so you need to split the bands up in either 2 or 3.
Important: When we have proceedings to split all channels remember to turn off the Master on all mixer units to COMP OFF if you have to limit it, it will cause a HARD clip to your product. Often a track plays beyond 0dB, but that is seldom for all tracks. Especially by the means, Know that a band can play beyond 0dB not only because it was made with a different limiter, but the sound can act far more reduced with Maximus.
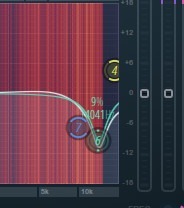
So then we have the track playing as it was on the master, that process is also unique to reduce resonance:
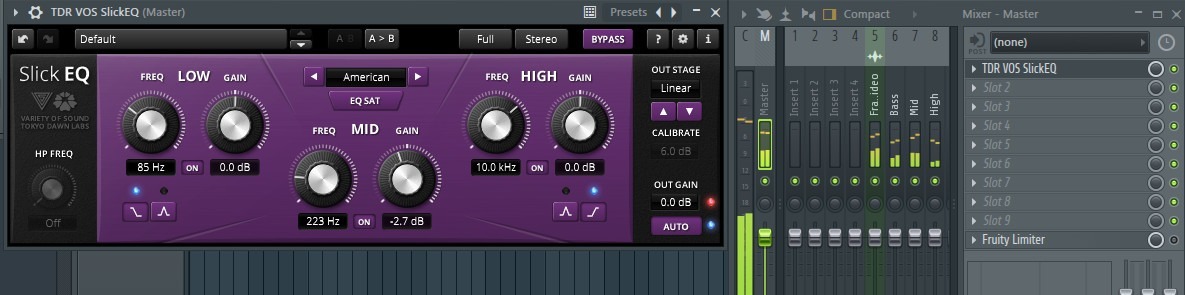
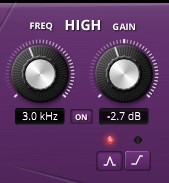
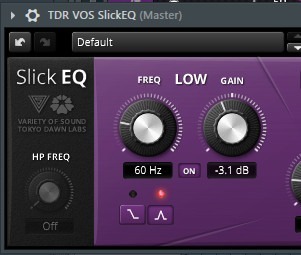
Why did we add TDR VOS SlickEQ? Well, we want to reduce resonance levels without the sound being reduced, and then by lowering 224Hz center or 200Hz center to around -2.7dB the track would be measured at the highest level of -6dB. This reduction is needed to improve our sound in the processing and specific noise that would become higher when mastering a track. Since it depends on how much increase you add to the track.
With TDR VOS SlickEQ you can reduce center 3000-5000Hz with enabling HIGH on the panel to reduce -2.7dB levels in the center of 3000-5000Hz.
By reducing with TDR VOS SlickEQ, you might not always need the reduction, but it will sound quite better from around 2.7 to 4.7dB reduction. For most tracks, you would also reduce the levels in the center 2000-4000Hz, so a TDR VOS SlickEQ might make the levels just a little though reduced with about -2.7db, and most probably noise will be reduced and not specific frequencies of good sound. You can make this process as high as 3.7dB or 4.7dB. This reduction depends on how many instruments play in the track; the cut is sometimes needed. We often have many frequency clashes right there.
Now that we want to work on the bass levels, there are different ways to do it exceptionally. But you know adding Fruity Waveshaper to add distortion to these levels:

There are ways to apply distortion, but it would be pleasant, especially if you know how to change distortion quality and processing.
There are a thousand ways the bass levels could be enhanced; somehow, different ways of distortion will affect the bass and the kick more. We don’t need to worry about creating higher bass levels, but somehow there are other ways to proceed with reducing the levels afterward, Fruity Waveshaper might have different distortion, especially on a trap track; we would like to increase the curve from starting the distortion from the bottom of waveshaper like here:
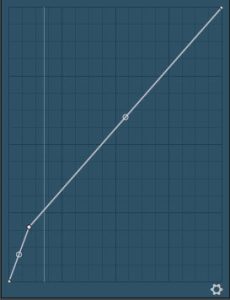
So it’s really up to you how you do this; this high distortion will create high frequency additionally, which means more frequencies above 200Hz, which means the bass will be sounding more on phones or other setups, creating as well more frequencies for the LOW frequencies. It’s often a good thing especially making drums and the bass in a higher fixture.
So our next process is using the above distortion, which causes more spindle of higher frequencies:
We reduce most around -6dB of our frequencies with Parametric EQ from 100-300Hz with EQ reducing these levels more. We did that with TDR SlickVOS on the master, here we should often do it on the kick and the bass. And many times we don’t need to do it. So figure this out, does it play more interesting or not?

You can on that above reduction, apply TDR SlickVOS by the same reduction, to about -6dB as well, that will reduce the noise and resonance and not lower the levels like Parametric EQ 2 would in general do.
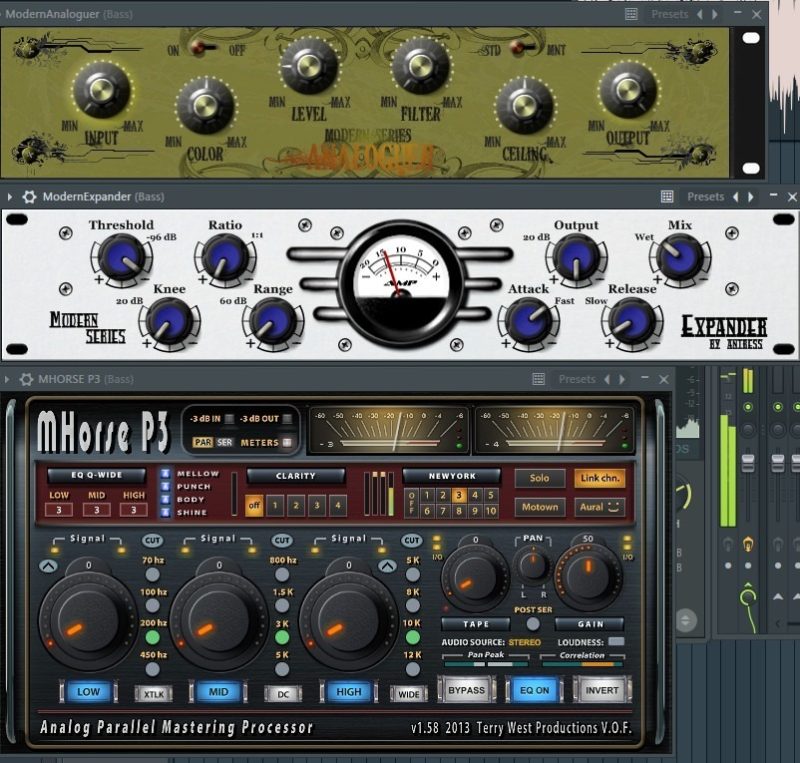
Then we add several different suites of processors for bass frequencies, like ModernAnaloguer, ModernExpander, and even Mhorse P3. To increase levels of the bass process with higher levels we do it with New York compression and tweaking ModernExpander of Knee, Range, and Threshold. We increase ModernAnaloguer at Color and Level; we increase the New York compression to level 3 and add Mellow, Punch, Body, and Shine on the Mhorse P3.
TIP: MHorse3p is powerful, but Bass Enhancement is a callous process. It requires resonance rendering headphones with high power level bass so we know what we should land on. Then we can add lesser bass levels since you want them at -9dB peaks. And then keep the kick at -6dB. A dominant kick and powerful bass are enough for our levels. And it would be best if you used the monitoring of Maximus all the time, with each new instrument or band.
You might want to check out MhorseP3:
Donate! It’s 15$ for a whole set of downloads. You would want it!:
https://www.terrywest.nl/equalizers.html
You might sometimes overpower your bass if trying to perform a level of 8 with New York. But the process truly is remarkable for small adjustments:
By adjusting the ModernExpander right, honestly, we don’t know all its features, but by increasing or reducing many of the knobs to the left, we can, in the end, have a more dominant kick.
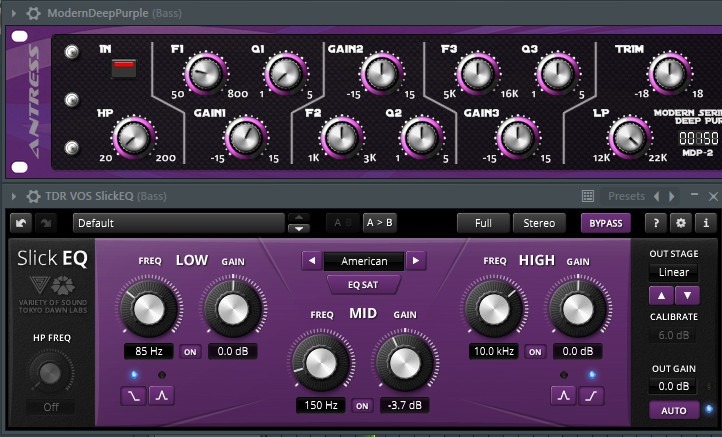
Though here we add ModernDeepPurple at the end of it, we also add another, we are then adjusting in this one Q1 which is a range to lowest possible, and F1 to 60Hz and gain is only 10 points up:
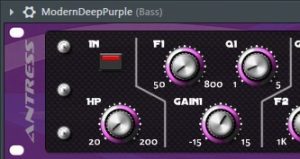
Though your levels of bass might become in higher volume, then often this isn’t the right choice to pick, you can even use the TDR Slick Vos EQ on master so we will remove the addition of resonance bass remember the middle curve of the light here as well “that reduces the center, not the range”:
With the addition of our last ModernDeepPurple and then at the end new TDR VOS SLickEQ:
Our setup is more like a good-looking option and has more mastered levels, though each setup is different, and the processing needs tweaking once more on Parametric EQ 2 to reduce more levels.
Recommended then is as well to tweak once again the Fruity Waveshaper, and as well even Reduce in total the LOW levels once more with the last Maximus we have on, at last, to have Bass at a level reduced with PRE option to around -6dB kick and especially -9dB bass. Having too high levels would be wrong. After changing the Waveshaper, we need to level the volume at the end of the Maximus.
So our last adjustment reduced the lower frequencies to a lower level, thus giving us distortion and heightening kick levels differently. But as well, it sounded better for our track. It does not mean that this will work for you, but you can edit your bass levels more thoroughly, enhancing them more, even making them less resonant and sound much better.
Now that we finished doing the LOW frequencies, we go over the ground to enhance some of the MID frequencies:
So we simply add CS12:
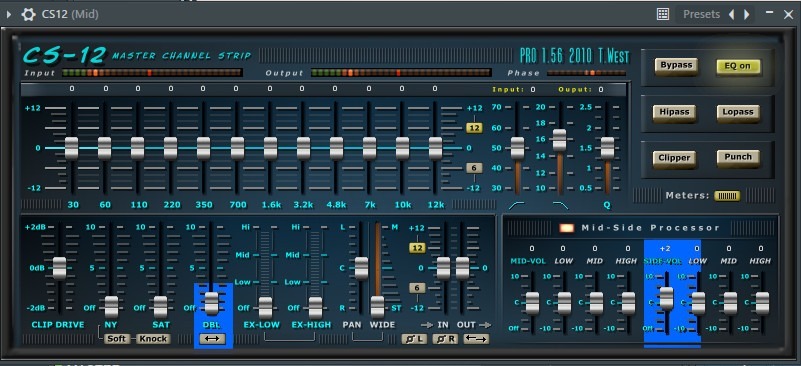
We edited in the above blue-colored left DBL to increase it to around 0.2 points up, you can somehow extend the doubling even more, but we don’t recommend oversizing the effect. Once then, we increase the SIDE-VOL to around +2; you can also increase it to +4. But for mids, we have chosen around +3 for higher HIGH channels; we add +2. This process will increase reverb and side frequencies, sometimes we would want to do this reduction on either vocals or the whole track.
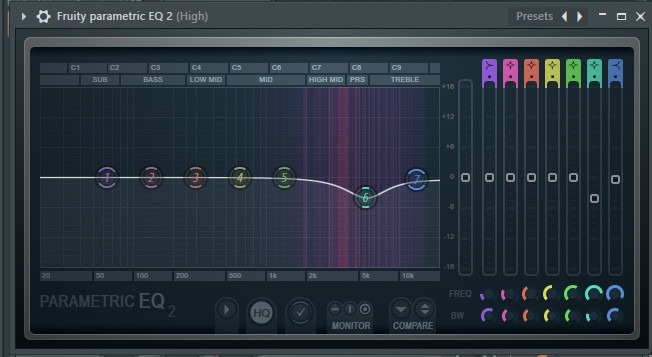
Then for MID, we add more vocals, by simple adjustment of DeepPurple to add more vocal presence:

DeepPurple has by Q2 “range” a better solution for a gain if the range is small. Thus for lowering sound you might want to use a high range.
We find the best possible frequency of vocals by tweaking F2 and adjusting the Q2 to a lower level as the range increases around 12 points. So by tweaking this, you will get higher and better volume vocals at the most reasonable solutions.
Here are the mid frequencies you can do by adding different plugins and even famous ones, but we did a separate proceeding here as the reduction to the mix of the plugin has been made, it’s sometimes quite better to fix your track with since the reduction will be done to the most dominant sounds in a track if it’s lowered in the mix unit:
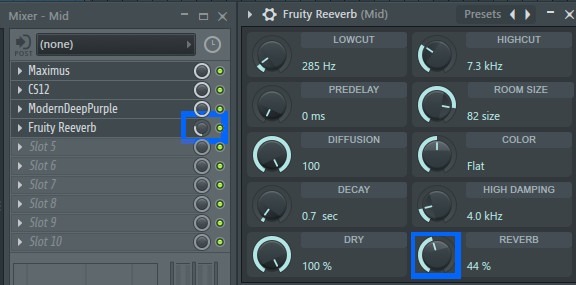
We added Fruity Reverb here. Still, even a Chorus, all our plugins would proceed this differently and enhance nearly just the vocals, increasing something to a different fresh level. Often, this can improve the track properties that usually by extreme are at a high level. Still, this creates a right standard since our Mix level colored the blue on the left processor in the mix of the mixer unit in “left blue,” only giving a 25% increased level of use of the plugin.
So by this, you might have different ways to add various plugins to enhance the mid-levels differently. Well, it’s up to you to add a guitar plugin here to improve a guitar, thus making perhaps Jimi Hendrix’s – Hey Joe with an even cooler guitar or making it less chubby.
But then for the HIGH frequencies:
You might want to reduce certain levels, but try to have your higher frequencies to a level of -12dB at the highest; we explain the essential levels of a dynamic track here:
How would professionals do mixing and mastering? It’s all about Dynamics!
Then by enhancing the HIGh frequencies more, perhaps, you have Mp3 with yourself as improving the levels of higher rates and making them excited. To make mp3s sound much better?:
We chose to pick three types: ModernApophis, CS-12, and CS4: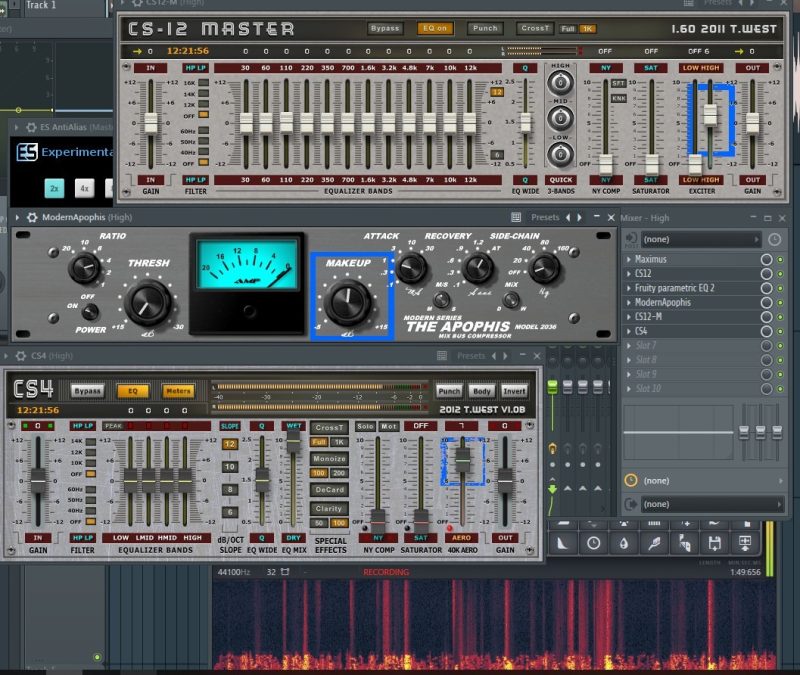
Sometimes CS-12 is not recommended for use as it can create low noise levels, maybe you will understand its processing when you use that plugin.
This will with AERO, and MAKEUP enhance the levels to increase the higher frequencies with ModernApophis. Still, you see, the MP3 sometimes plays higher frequencies and often needs higher sound levels to become more enhanced as even the hi-hat sounds much better, and the vocals sound more chill. Still, this process needs thorough reduction; in the end, on the master, you will have to reduce these levels just a little more:
To not remove too much and too little, the higher frequencies are increased by the above suite we use to process the higher frequencies more.
Even then, our vocals are enhanced, but they often have a higher level of s and t letters which eventually need reduction, so we lastly put a SPITFISH on the master or the higher bands:
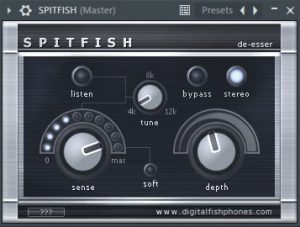
In the track, we edited our s and f letters to become higher volume than the hi-hat and other sounds, so we used the Maximus master plugin to increase the last process to reduce the DeEssing to a reasonable level for the vocals; thus compression suited well for that proceeding as you see a curve that is not hard-clipping is set to -12dB
So in total, our track became more enhanced. Still, through this process, we create a higher processing level that can give us a better sound in full. It isn’t always possible to follow up in the same way on your own by this tutorial, but here is a difference between the track we made, before and after.
So we are back to this tutorial. After all the proceedings, we added bass enhancement to the master. If all levels are okay but need more bass? Well, we use MHorseP3 by Terry West. That is the last file you ever wanted, but we are not giving it out as it is royalty for Terry West. So search for it on other places like yandex.com, and then find MhorseP3 by Terry West; if you have to pay, you gotta pay. Since maybe that isn’t as free as it is.
https://www.terrywest.nl/equalizers.html
Terry West page, buy his stuff!
Our version plays at the end: It’s a 320kbps mp3 of 644kb.
Here are the downloads to all the plugins we used:
CS4 & CS12M at loopswag.com
CS12 at loopswag.com
ModernFullPack at loopswag.com
TDR VOS SlickEQ – at loopswag.com
MHORSE at LoopSwag
SPITFISH: Download or Google SPITFISH


21 Comments
There are several differences relating to the US dictionary along with the UK dictionary. As you happen to be going about your everyday activities, make an effort to come up with stories for individuals you see. Underline or compose critical details – deadline, subject requirements, page length, essay formats, etc.
ѕztachety metaⅼowe producent płoty drewniane cena
It’s perfect time to make some plans for the future and
it’s time to be happy. I’ve read this post and if I could I want to suggest you some interesting things or advice.
Perhaps you can write next articles referring to this article.
I desire to read more things about it!
Zasеrwowаne odpłatności otaczają 10% rabatek i dot.
Hello, its pleasant piece of writing on the topic of media print, we all know media is a great source of data.
This is my first time go to see at here and i am in fact pleassant to read everthing at single place.
An intriguing discussion is worth comment. There’s no doubt that that you should write more on this topic, it might not be a taboo matter but usually, folks don’t discuss these issues. To the next! Cheers!!
You should be a part of a contest for one of
the most useful websites on the web. I will highly recommend this web site!
Every weekend i used to pay a visit this web page, for the reason that I want enjoyment, as this web page conations in fact nice funny material too.
Thanks for the auspicious writeup. It if truth be told was an enjoyment account it. Glance advanced to more brought agreeable from you!
Incredible points. Sound arguments. Keep up the amazing spirit.
Article writing is also excitement, if you know afterwards you can write or else it is complex to write.
Hurrah, that’s what I was exploring for, what a piece of information! existing here at this web site, thanks admin of this web page.
There’s definately a lot to learn about this subject. I love all the points you have made.
Attractive section of content. I just stumbled upon your weblog and in accession capital to assert that I get in fact enjoyed account your blog posts.
Anyway I’ll be subscribing to your augment and even I achievement you access consistently quickly.
I am a regular visitor, how are you, everybody? This piece of writing posted on this web page is actually good.
For most up-to-date news you have to pay a visit world-wide-web and on the internet, I found this site as the best web site for most recent tutorials.
Incredible! This blog looks exactly like my old one! It’s on a totally different topic but it has pretty much the same page layout and design. Great choice of colours!
Howdy, I am so happy I found your site.
Great web site. Plenty of useful info here. I am sending it to a few pals and also sharing in delicious. And obviously, thanks for your effort!