After several hundreds of projects and several years of production, I have discovered through listening to mostly all equipment possible to know the right levels of any mix, even listening to many different tracks. Some that often play on the radio have a minimum height of sounds and are also going down low as -6dB and even sound properly good. And you feel the bass as the same as 0dB in most of any equipment.
But some of this experience is somehow a few times better at 0dB music. Since you will hear the difference between the more detailed details to the velocity of your tracks sounds or even vocals. That is thus called the Dynamical track.

Most still push some levels up high to roof though, overpowering many certain levels or even low frequencies to high, most also create a substantial bad impact to their highest frequencies.
After years, I knew what the master 0dB was capable of to have to be able not to be blown out by too high frequencies of low bass frequencies and at some point to have the best possible wave of the track. To make it look as if it has a beautiful wave. That needed to succeed with the maximum levels still being at maximum level without overpowering it too much and being limited without causing any distortion to the track’s frequencies through the last master channel limiting to 0dB.
A wave resembling more spikes in the look, especially at sites based upon SoundCloud wave, was the look I always was out after. Some might remember at the beginning of SoundCloud, and these good tracks also had a particular detail to the music in their aesthetic aspect of the wave. The wave could distinguish producers from being bad to the better ones, but they changed to a universal look of the wave for one day. But still, you might see some tracks having a look like a vibrator and some excellent detail.

The low frequencies of a kick “40-60Hz” most times aren’t allowed to be higher than -1.5dB to -2dB; that’s because the master limiter will anyway set its range to that level. As well as for the bass, it should most likely be no higher than -5 to -6dB as the highest level of sound more likely an RMS max of height in volume. That might be false when speaking about Trap beats 808’s. But mostly, all modern Trance to EDM have these levels on their bass if they sound properly for being allowed on the radio or being the right quality track. Even most Techno.
The bass frequencies of 0-100Hz drive best as possible when setting it to -6dB and not higher. But the recommended level for any bass indeed is -9dB. Why? It’s because that will be too heavy feel for even the most expensive to also many cheap headphones, “Which have no filers.” Most often, too high levels as well from 100-200Hz should not be even higher than -9dB. Somehow these levels even shouldn’t surpass -7dB.
But as you keep kick levels beyond -2dB, your tracks acquire a level of -1.2 or 0.4dB, sometimes with the master limiter you use. So it will end up very bumpy from time to time by any means to achieve this. And your mix will be inconsistent as your kick will outpower some frequencies. And Distortions to your mid and high frequencies can occur.

Resonance problems occur to speakers with no copper filter, and resonance at these levels is stated by the sound, which formally isn’t bass but has been taken to this part by lower pitch, perhaps a synth pitched down to bass. Often these levels make a sound of muddiness and frequency fight, which might do as well. But as far as levels from 100-200Hz, this should be much lower than the standards under 100Hz.
To the mid frequencies divided into 200-4000Hz or 200-2000Hz, these need to be at a level where it does not hit the instrumental work above -6dB, even up to -2dB at max. In comparison, it has a vocal loaded in it the track, these are needed to be up to 0dB, but even -2dB will sound good at any point. The lower you can get without the problem of sounds where it is not heard, and it’s the best option. Some vocals might as well end up too loud in a track if they are near 0dB. But also, for most beat producers, it’s essential to set these levels not too high for an instrumental higher than -6dB. Even lower levels would be more interesting for most buyers of your helpful instrumental. And your mid frequencies often are better as an instrumental when these frequencies are below -9dB.
Overall it’s better to have a lower sound than too loud.
In the end, I instead set my high frequencies from 4000-22000Hz to around at max -12dB. Sometimes it does not go beyond -9dB. But for these frequencies, I also tend to more likely distort them to make them sound fresh as a total mix. I do it with Maximus creating a curve that distorts to the highest frequencies on the envelope. It does not even need a high push with a slider.
So having your levels distorted will end up in a mixing solution in the form of a gluer, which sounds good with Maximus added to the project at the beginning of FL 10. Which was the Soundgoodizer preset? It had a cool sound gluer of the high frequencies. And that ended up well. So you might want to add Soundgoodizer, A preset of Maximus, and learn what it does to the higher frequencies with its envelope.

Having the highest frequencies above these higher frequencies will most likely get your tracks killed for the listeners. Especially when there isn’t a way they can be auto-filtered. Some equipment does filter your track. It’s at the expense of the listeners who complained on either iPhone playing lousy sound.
The right solution for anyone is to edit all your sounds solo to understand what is too loud in the track. This soloing goes for when you are adjusting all sounds in one. But you also have to test out the sounds when you are running the full track as well.
A great tip is always to know what the centre of 3000Hz does do for you by any means. Since having to high load from many sounds at that centre, you most likely will have a problem listening to your track by others. Even many claps are too high there. Most often, it’s dependant on what you can split up listening to a song in your mind — knowing all types of instruments and distinct them on your own, even for a song with 20 different instruments in one melody. Did you know that most do not hear more than 5-6 different instruments played in many tracks?
To the most important about a kick: The frequencies surely need not be higher than -1.5dB to -2dB. But it’s often because the 40-60Hz is the centre of the kicks hit if you don’t use an extra bassy feel to it with frequencies up to 100Hz. Unless then, that is a simple kick. Your frequencies from 60-100Hz even up to 200Hz can be too loud if your kick is pushed up to 0dB unless soft clip limited with Maximus on the master channel to be -1.5 to -2dB.
Most who do not understand the equalizing of a kick from 100-200Hz most likely should buy better monitoring equipment since these levels are very dependent on the quality of a kind sound kick. It can sound right for you without any edit of the kick. But does it sound right for others? The equipment you have might have higher impedance, a copper filter in the speakers; taking these out would be more reasonable even to reduce these levels further. These levels most likely get filtered in different man equipment, which gives an excellent sound to it for most. Some will have a problem listening to your track most times when they use different technology speakers.
Lets us go to a more visual mastering possibility. Here you will see in the next picture that the kick got again with the PRE option in the Maximus just after in the upper equalizing. Then another equalizing after the gain has been made to 0dB with Maximus has been applied, the other Parametric that sends that kick to the master:
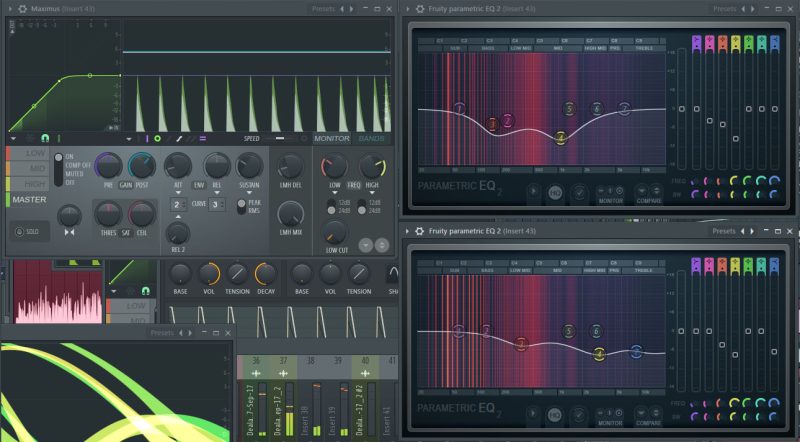
Then the kick gets its desired strength of the frequencies it has from 30-80Hz. But mainly focus was the gain of the centre of the kick.
As it goes to the master, it is reduced to -1.5dB by the Maximus envelope I put in:
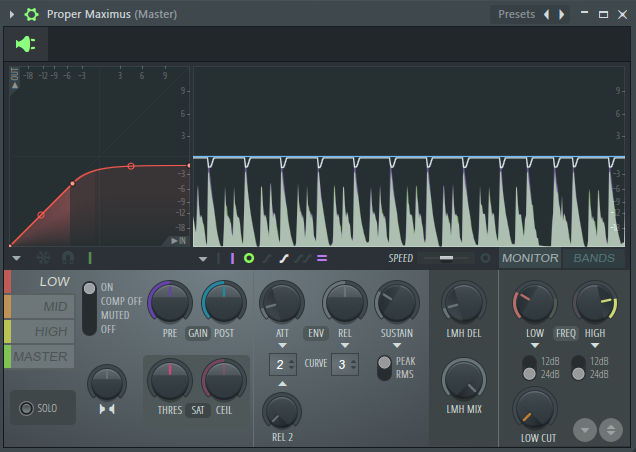
But as you see in that picture is my bass in the track that runs -6dB at most; it is even not limited as the drums are at above to be getting limiting. The limiting is something more proper as something mentioned as analog master or creating the sound into sine wave than if it even was a square with distortion. That solution is most likely to be called a soft clip limit, which isn’t a hard clip at all. The important thing with that is the Envelope set to curve to -6dB! Not actually following this example of -2dB, which is the maximum a wave can have without full limiting, which forms the kick into a sine wave.
In the next picture, you will see mid frequencies to play at the highest level of -3dB but stays mostly at -6dB. That is a track with the right vocals track; to have higher levels than this is undoubtedly unnecessary for most tracks. But I turned the whole mid frequencies with the PRE option in the Maximus down. To reduce the need that the track will have high levels that will also be limited. It is not needed to have too loud a sound. It is reduced to up to -4.7dB with the mid frequencies using the PRE option in Maximus in my track.
Tip: You could try reducing your levels with Maximus on low mid and high if you use the compressor. It does not compress unless you have a curved envelope, and you push the levels into the envelope.
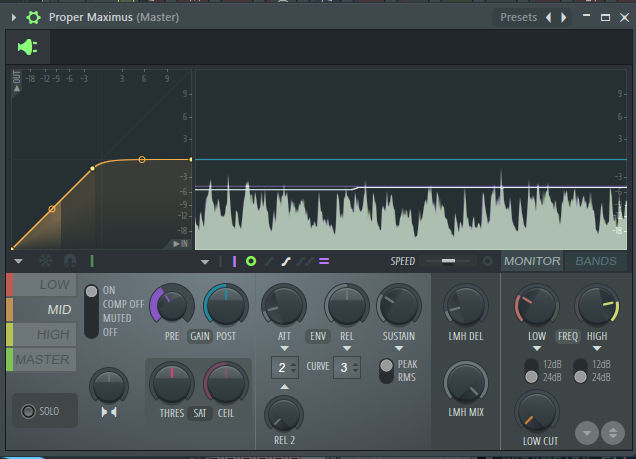
Then let us talk about the higher frequencies in the same track I’m talking about; the frequencies have no higher power than around -12dB. But they have a small distortion with the envelope and a more soft clip going into the field beyond the line, with the higher frequencies into compression of -6dB. Sometimes you could just put a limiting on -12dB and not do anything with mastering your track, and you might end up with a decent track with auto mastering your high levels into -12dB.
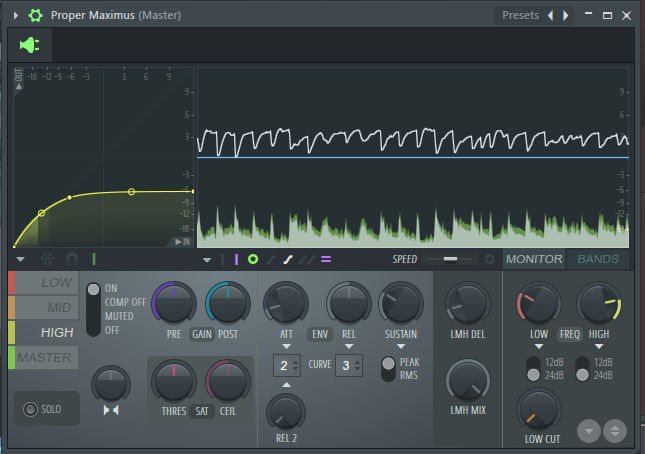
In the end, the whole track will stay at 0dB the entire time, even at the highest levels, so if I have perhaps 0dB kicks? Well, then the levels will surely be all over 0dB even with too high mid frequencies that will occur in the same situation, but as far as this looks using those above methods:
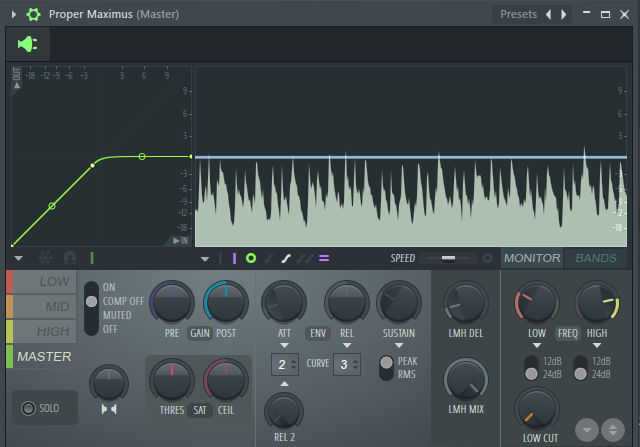
But why has it the option on Maximus: COMP OFF? Well, I tend only to use the Limiter called ModernLimiter you can get from Antress; it gives the highest possible 0dB since the Maximus master limiter is cranky bad and will reduce power to under 0dB.:
Some plugin creators who made a plugin called KClip have the same properties as the ModernLimiter, but can make a higher-level mix that can be made at different proportions for some enthusiasts.
Modern Limiter in the fresh plugins pack: http://antress.blogspot.com
Download the package from us! Antress has a broken link!:
Download: ModernFullPack at loopswag.com
Also, remember always to have LOW CUT off in Maximus! It causes a compression problem and a problem with your bass! However, you can use Parametric EQ 2 with the 20hz cut preset if you need to cut these levels off.
“I tend to put an Edison at the end of the master and use the Record button with the on play option and render any render, then I go back to the Edison and copy the wave 32bit out to new FL Studio and render my versions. Doing so, the process gives me a lesser problem based on some plugins that render differently as an external render of quality than the played track.”
Then you will see the wave of the track how it looks like a wave:

Do you know why the upper field in that stereo is higher? It’s called offset problem; it was caused by my bass that most often are with the acid type of basses; using the centre FL plugin is a solution. But sometimes, it is not a massive problem for most tracks. The centring plugin called FL Center can be found in the plugins with FL.
Here is a proper look at the track on perhaps SoundCloud. That is based on the particular rule to happen, most often when mid and high frequencies go lower than the low frequencies. But it’s also based on whether you have a right equalization of mostly all your tracks properties. Even using a sidechain with your bass correctly. Since a combination of both bass and kick might make the track somewhat flat:

Remember also the thing about this. All your sounds need to be appropriately equalized, as well. That task is not the easiest thing to do if you can’t hear the harsh level around most tracks worldwide. Even the tracks looking like a vibrator on SoundCloud that most say unmastered preview new producer in the hood using no Equalization. Then be deviant that you might sit with a non-proper headset or speaker doing your job with any of your tracks in the wrong way. You have to get something that sounds the worst in the proper mean. Some SoundCards are even also the cause of problems occurring for many.
Enjoy a better level of sound production on your next projects!
This tutorial is no means to show you how to be at the loudness war. This tutorial is to show you what can be done to maximum levels with especially low-frequency levels. It does not tell you to have the highest possible level; if you are uncertain at a specific gain you will get, I recommend using just Maximus Master Channel on for end Limit instead of using ModenLimiter.
Tip: Remember to use the Maximum Lowest level for your track. A high level is not always needed. Some producers made breakthroughs with just the level they seemed to be grateful for, which was the highest possible but still lowest possible!



2 Comments
I truly love your website. Did you make everything by yourself? Please comment back as I’m looking to create my own website and would love to learn where you got this info from. Kudos!
Surely most is content by Dealazer a great producer.