To denoise your vocals, it isn’t hard, but it’s necessary even to gain the sound levels, to also have the best possible source to use to put your effects on. Some results will not have a good quality based on the original recorded source, especially reverb, which does not sound right without denoising.
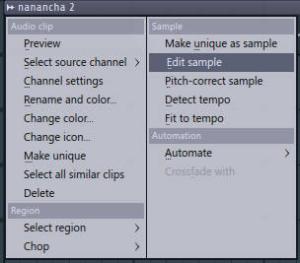
So get down to business, open your projects with already placed vocals in its playlist. Then edit the file pushing slowly on the wave button on the left of each sample or you already perhaps have it in your Edison:
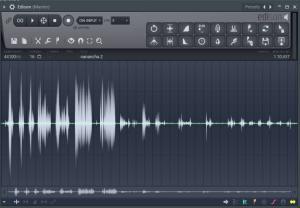
It will open the Edison: For beginners, it will open just plain Edison like in the first picture:
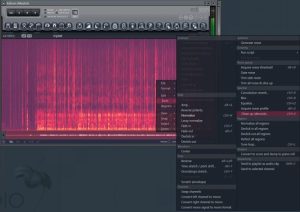
So you don’t see anything of the noise; Then do as following “right-click on the wave and select; Spectrum.” Like here:
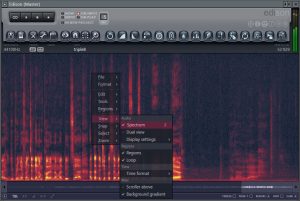
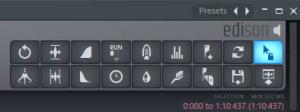
Now you can select the range where the vocals are less visible or with just noise; that’s the range without red or yellow spots; Use the middle mouse wheel to look deeper into the vocal. Also, the lucky horseshoe down on the right side of Edison will give you a possibility to grid chose and quickly detail chose. Turn it off for a detailed grid select.
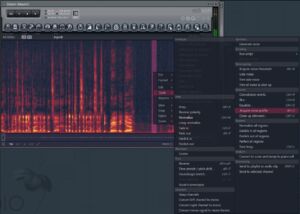
You then gotta choose Aquire noise profile “alt+u” of the red you have covered with the first mouse button as perhaps the whole vocal sample. Later on, use the mouse wheel out when you have chosen a noise profile. The profile does not need to big at all, even near a few milliseconds, just that you believe it’s enough noise to cover the noise spectrum. After then also choose the whole grid of vocal with mouse button as seen on this; then choose cleanup denoise “Ctrl+u.”
Tip: If your vocal has precious bass frequencies, but as well, you see the color yellow or red on your vocals, you are trying to use it as a noise profile. Then all you should do is to reduce this level with something called Equalizer. It is a specific choice, especially when you are thinking of to remove particular frequencies that already have a vocal touch or sound that you don’t want to be in the noise profile.
Now the tricky part, as shown in the next picture below. Choose a threshold instead of the center, but the higher the threshold level it is, the denoising will be at a higher rate. The above threshold rate is better than the denoising level; it does not do that much to all levels. Sometimes even having it at a higher range will eventually give you certain levels of removal. But -6dB is mostly often sound lower than -6dB of noise, so setting it to negative value would for some be better, but having it centered is a choice. Most often, any noise that is lower than even -32dB. But it can ensure the lowest sound level will be affected by noise removal so that a higher threshold will provide a higher probability of removal of detected levels.
BEST TIP: Also, the denoise level of your denoising: You can then set it to light 10 in the blue color. Then repeat the denoising process 5-6 times. This option is near the same with the newest FL Studio. It only works most often for 32bit FL Studio, since FL Studio 64x does not have denoising integrated. Unless newer versions will have as perhaps FL 20. And yeah, how many times you repeat the process is better than just using one process of the process since the artificial sounds might occur in a badly denoised way.
But when noise is an instrument and the vocal is vocal. A very lighter removal is needed. Then at least 10+ times removal. Mostly because when denoise levels are too forceful with high denoising value at first, there will be some artificial sound in the high frequencies that can make a vocal out of proportions. Be aware! It can turn your vocals sounding robotic!
Remember, you can reduce the denoising as shown in the red square; that way, you can reduce the denoising done to bassy levels of the vocal. Sometimes there might not be noise there but just particles that aren’t noisy.
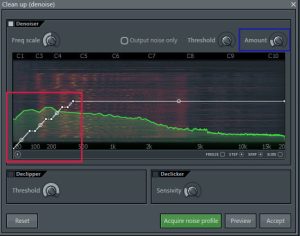
Tip: You can also play the track using “Output noise only,” but you have to remember your levels if you are doing precise denoise by going back to the whole track process. Since you might end up denoising an entire track, for example, filled with instruments, and that is needed to outsource the vocal. Because you can only monitor how the vocal will start to begin with being made denoised, it’s possible. Still, for enthusiasts using all, they’re whole day trying to get the best possible Madonna vocals for that.
Important Tip: Don’t do the denoise on already recorded vocal you have done in Edison. First, make a copy of the track and paste it to your playlist. Using the pointer button and drag and drop that vocal track to the playlist. The recording will then stay in the sliced beats folder. In FL Studio 20, it’s in the Documents folder.
Also, try using the Output noise only to hear what you are removing. If there are vocal noises, you probably have a wrong noise profile. Be careful with the unsuitable profiles!
Also, the frequencies from 100-1000Hz can often be easy removal and hard on your vocals bass feel and might cause different aspects of removal. They are causing various problems since the waves are not that easy to recognize, just hearing the vocals in low depth frequencies.
Remember always to save your original vocals first when your record with Edison!
Did you know that noise on anything out there is also the problem of 24bit and 16bit processing that Windows computer has on recordings? Especially when FL Studio is 32bit primary processing. So many units do create issues for you anyhow. It’s a pity tho. Hard workship makes a pitty sound. But remember there is a solution to that, And that’s the newest Creative AE-5 sound card. With 100% 32bit processing. Especially the best solution for a 32bit FL Sound. You are giving the advantage of anything.
Since when you don’t dither in FL from 32bit to 16bit, you also get noise. That is the particular noise that is created with different units with 24bit to 16bit change, or 32bit to 16bit. So there is perhaps no soundcard yet as only Creative for FL Studio. Always, in the end, remember to use dithering on anything being 16bit and 24bit in FL Studio- Never do a release by 24bit on FL lower than FL 12 or even 20 without dithering! That is dead noise and destruction. Since FL 24bit dithering does not work correctly for all FL Studio before FL 12, you should upgrade FL Studio. But as well to always dither if you are unsure what dithering is.
So when you want to save a copy of your file; It will be kept in the sliced beats folder in; When you drag and drop the vocal that is marked red in Edison on a playlist or step sequencer.
C:\Program Files (x86)\Image-Line\FL Studio 12\Data\Patches\Sliced beats
On FL 20, that is in the documents folder.
Tip on denoised robotics: You might want to remove the artificial sound on an already processed by others vocals. But these also most often occur at higher frequencies above 5kHz. So chopping it down can be a solution by all rates higher than 5kHz removed with Parametric EQ 2 preset 20hz cut + 18kHz cut. You can drag to 5kHz through this removal process can remove too much in vocals. But are an excellent choice for too many artificial sounds.
It’s possible to gain further new frequencies of higher than 5kHz if you lost it all. With a simple excitement technique. Since making soprano, the sound is a possibility to do so. If you need that kind of knowledge, it does not come for free. It’s beyond what most would imagine possible. But CS12M by Terry West already has an excellent extra effect for Exciting high frequencies. You are mainly copying the sound of lower frequencies to higher ones as masking. Even Modern Antress Plugins can do that magic if you don’t think by logic. Some unlogic changes can end up in charm. It depends on how you know your soulful music. Like makeup of the frequencies can be done.
End Tip: Remember to adjust the denoise amount to max 10. Then use multiple times denoise. Up to 5-8 times. And you don’t need to acquire a new noise profile each time!!!
Just denoise without adding up to artificial problems by wrong settings!:



5 Comments
Pingback: How to extract Acapella from an Instrumental? | Loopswag
I’ve been surfing online more than 4 hours today, yet I never
found any interesting article like yours. It is pretty worth enough for me.
In my view, if all webmasters and bloggers made good content as you did, the internet will be a
lot more useful than ever before.
Awesome blog! Superb content! Like like like!
The place else could I am getting that kind of information written inn such a perfect manner?
I have a venture hat I am just now running
on, and I’ve been on the glance out for such information.
Having read this I believed it was really enlightening. I appreciate you spending some time and effort to put this informative article together. I once again find myself personally spending way too much time both reading and commenting.
But so what, it was still worthwhile!